1
Part I · Getting started
Welcome to pitShop.ai
pitShop.ai turns your travel content into a business. Every video or post you'd normally recommend something in gets its own Storefront — a page that carries your recommendations and earns you a commission when someone books.
This guide walks through exactly that journey: apply, get invited, run through the one-time setup wizard, and publish your first Storefront — once you're in, it's about ten minutes to your first live page.
Before you start, have ready:
- An email address to apply and later sign in with
- Your primary platform handle and profile URL, plus a rough follower count — you'll need these for your application
- Your YouTube and/or Instagram handle, if you'd like to connect them once you're in — you can always do this later
- A link to one piece of content you already want to build a Storefront around
2
Part I · Getting started
Creating your account & signing in
We're onboarding creators as a small, invite-only cohort right now, so there's no open sign-up button to click. Every account starts with an application — here's exactly what happens between applying and landing in the portal.
1
Apply at pitshop.ai/join
Tell us about yourself: your name, email, primary platform, profile URL, follower range, industry, and country. There's also an optional field for anything else you'd like us to know.
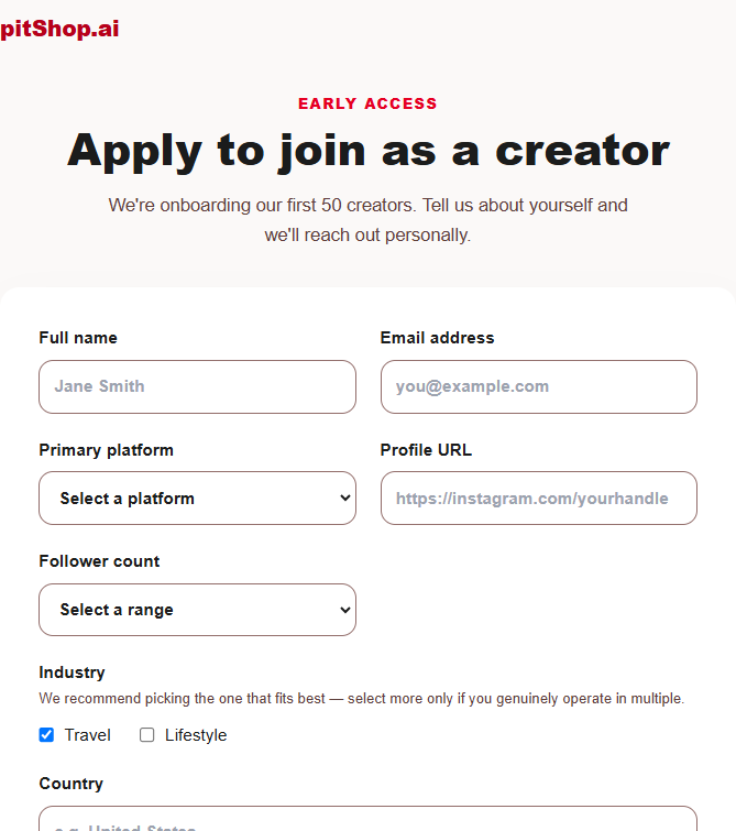
pitshop.ai/join — the creator application form
2
We review your application
Every application is reviewed individually — there's no fixed turnaround time, so there's nothing to sign in and check in the meantime. Watch your inbox instead.
mark_email_unread
"You're on the list!"
That confirmation on screen just means we received your application. It's not an acceptance — the invite email in the next step is.
3
Accept your invite
If you're accepted, you'll get an invite email — open it and click the link to accept.
mail
Invite email — "accept" link
Screenshot coming soon
4
Create your password
The link takes you straight to a create-your-password screen, with your email already filled in from the invite. Set a password and you're done.
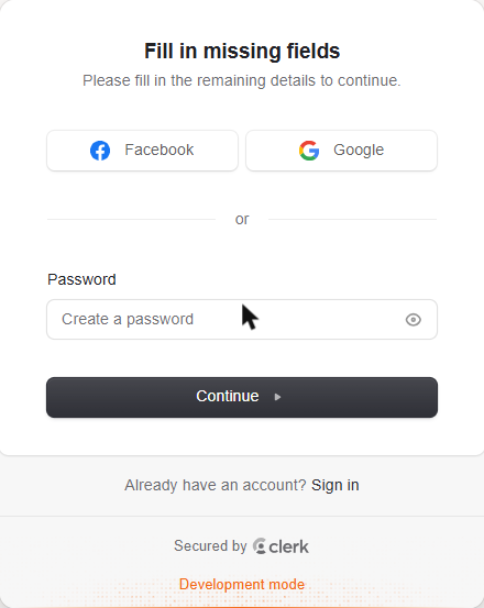
Create your password — the last step before you're in
5
You're in
You're signed in automatically and dropped into the creator portal, ready to fill in your profile. The Quick Setup Wizard opens on top immediately — that's Chapter 3.
3
Part I · Getting started
The Quick Setup Wizard
A short, six-step modal that gets your public profile ready. Only the first step is required — everything after it can be filled in now or skipped for later, and the wizard will offer it to you again next time you're in the portal until it's resolved.
1
Your storefront address
Required
Enter the name shown to your audience, and choose your storefront address — this becomes pitshop.ai/@yourslug. Availability is checked as you type. You can still change the address until this step is finished, but not after.
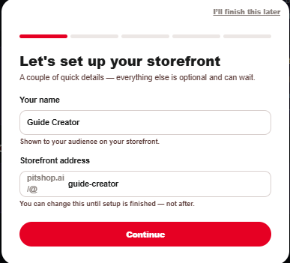
Setup Wizard — Step 1: display name & storefront address
2
Personal details
Skippable
Add your first and last name and a profile photo. These save straight to your account — if either has trouble saving, skip it and pick it up later. (If your name is already set from how you signed up, as below, you'll just see the photo prompt.)
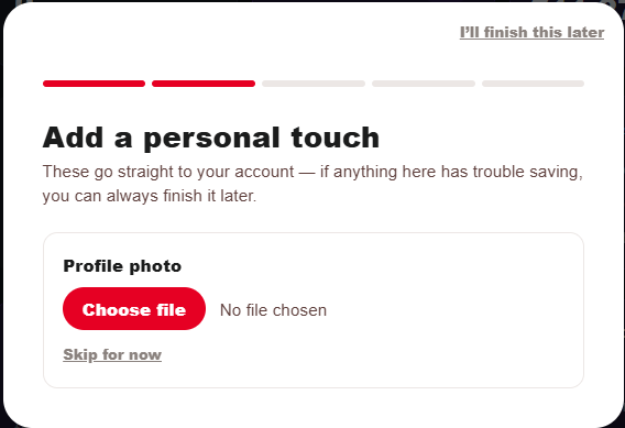
Setup Wizard — Step 2: profile photo
3
A few starter photos
Skippable
Add up to ten photos for the gallery at the top of your storefront. The first photo you add becomes your cover image — you can reorder or change this later in Settings.
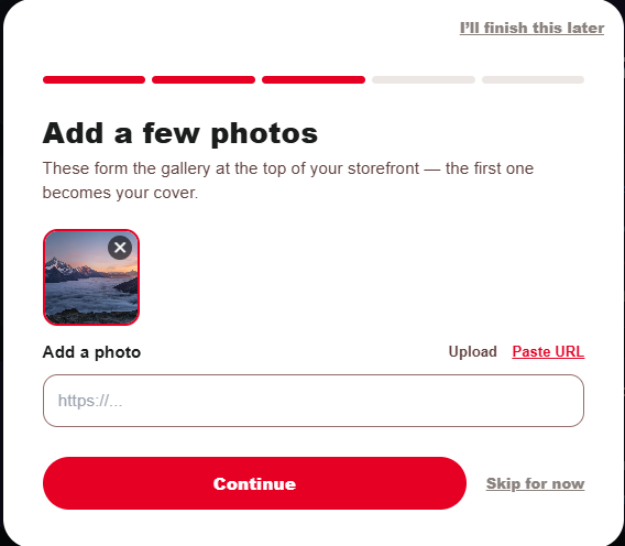
Setup Wizard — Step 3: starter gallery, with a photo added
4
Connect YouTube
Skippable
Enter your YouTube handle and we'll pull in your channel details automatically. No channel yet? Choose "I don't have a YouTube channel" and move on.
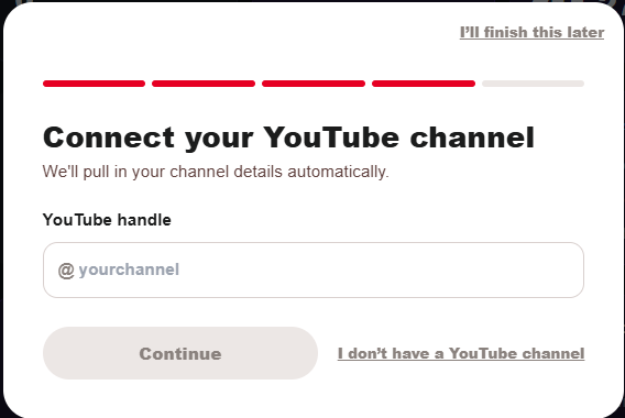
Setup Wizard — Step 4: connect your YouTube channel
5
Connect Instagram
Skippable
Connecting Instagram takes about ten seconds — you're sent to Meta's own authorization screen, and everything you've already filled in is saved, so you land right back at this step.
hourglass_top
Early access: accept a tester invitation first
pitShop.ai's Instagram connection is still pending Instagram's App Review, so for now this only works for creators we've added as testers — and you'll need to accept a tester invitation on Instagram before this button will work. See Accepting Your Instagram Tester Invitation for the one-time steps, then come back here.
verified_user
Is my password safe when I connect Instagram?
Yes. Connecting Instagram uses Meta's own sign-in and consent screen — you authorize pitShop.ai there, directly with Meta, and we never see or store your Instagram password. We only receive a permission token, which you can revoke at any time from your Instagram/Meta account settings. See Chapter 17 for more on this.
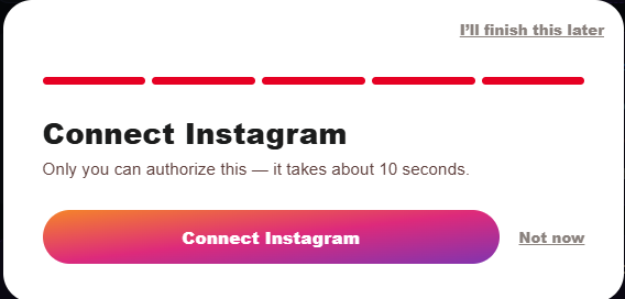
Setup Wizard — Step 5: connect Instagram
6
Review your bio
Skippable
We draft a starter bio from whatever accounts you've connected. Edit it however you like, or write your own from scratch — nothing here is locked in.
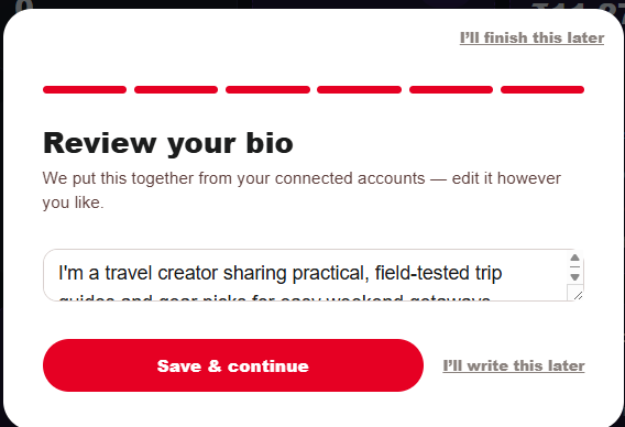
Setup Wizard — Step 6: review and edit your auto-drafted bio
celebration
Setup Wizard — completion screen ("You're all set! Your storefront is ready to go.")
Screenshot coming soon
4
Part I · Getting started
A tour of the creator portal
Once setup is done, here's what you're looking at. The same destinations are always one tap away, whether you're on desktop or on your phone.
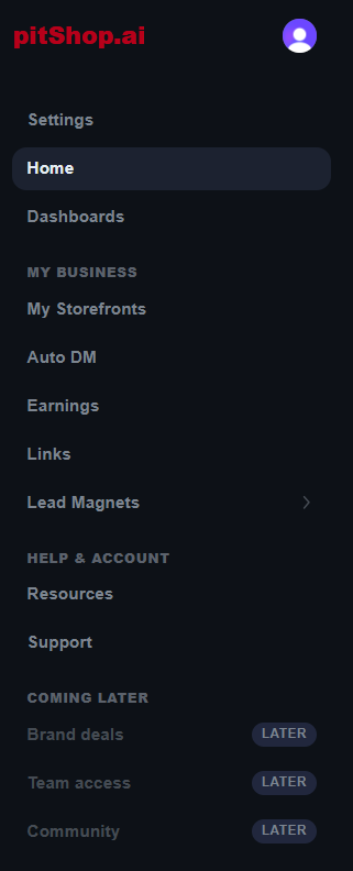
Desktop: the sidebar
- Settings, Home, Dashboards — sit right at the top, reachable from anywhere.
- My business — My Storefronts, Auto DM, Earnings, Links, and Lead Magnets (Downloads, Connects & Workbooks).
- Help & account — Resources and Support.
Mobile: bottom tabs
On your phone, the four everyday destinations sit in a fixed bottom bar: Home, Storefronts, Earnings, and a More button that opens the full menu as a slide-out drawer.
Creator portal — desktop sidebar navigation
smartphone
Creator portal — mobile bottom tab bar & "More" drawer
Screenshot coming soon
5
Part I · Getting started
Creating your first Storefront
One template, different content each time. A Storefront pairs one piece of your content with the products and places you recommend in it — this is the core thing you'll be creating on pitShop.ai.
1
Add your content
From My Storefronts, choose "Add social content." Paste a YouTube or Instagram URL, or upload an image directly if the content isn't posted anywhere yet.
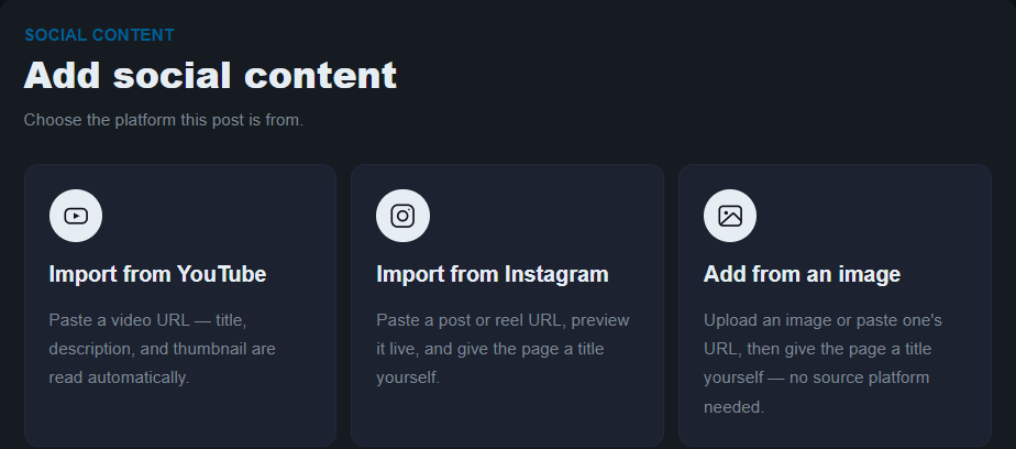
Choose the platform this post is from
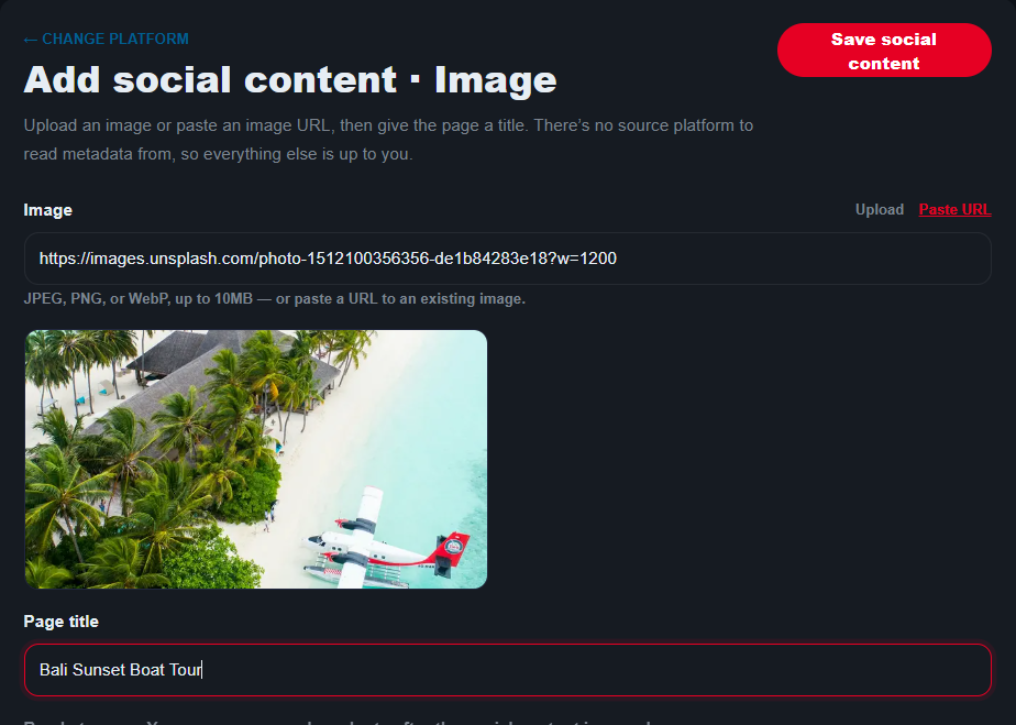
Add a photo & title, then save
2
Review the auto-extracted details
We pull in the title, thumbnail, and other metadata automatically. Edit anything that isn't quite right before moving on. (Import from an image, as here, skips straight to saved since there's no source platform to read metadata from — YouTube and Instagram imports populate this from the actual post.)
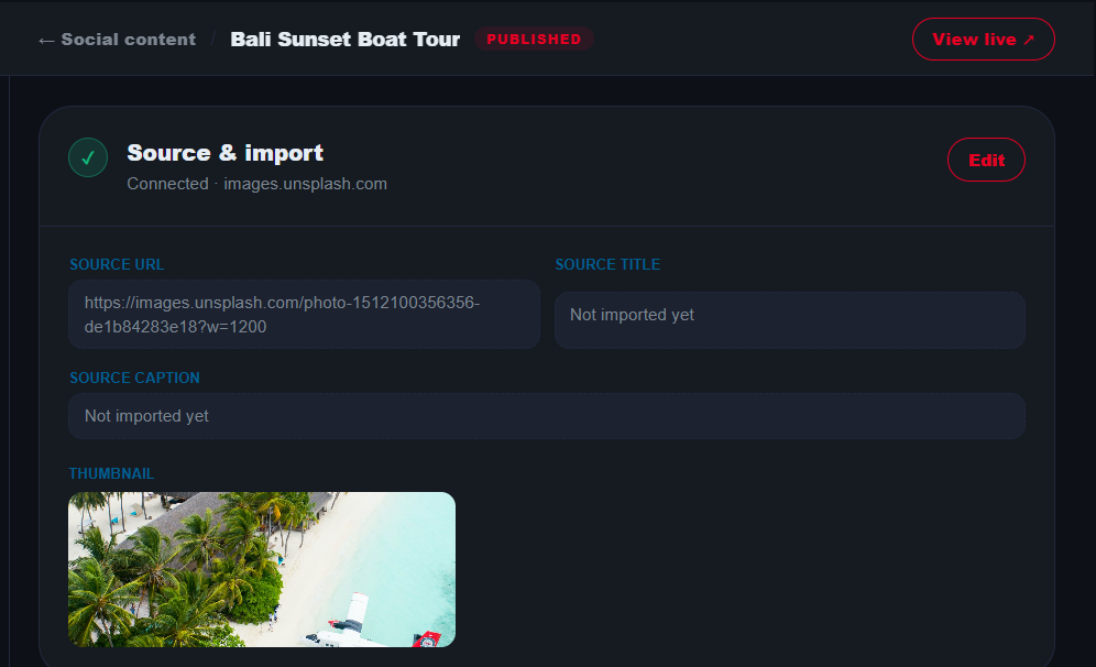
Storefront editor — Source & import, right after saving
3
Tell your story
Build out the page content: your story blocks, a photo gallery, a "Getting Around" section, and any travel tips worth passing on.
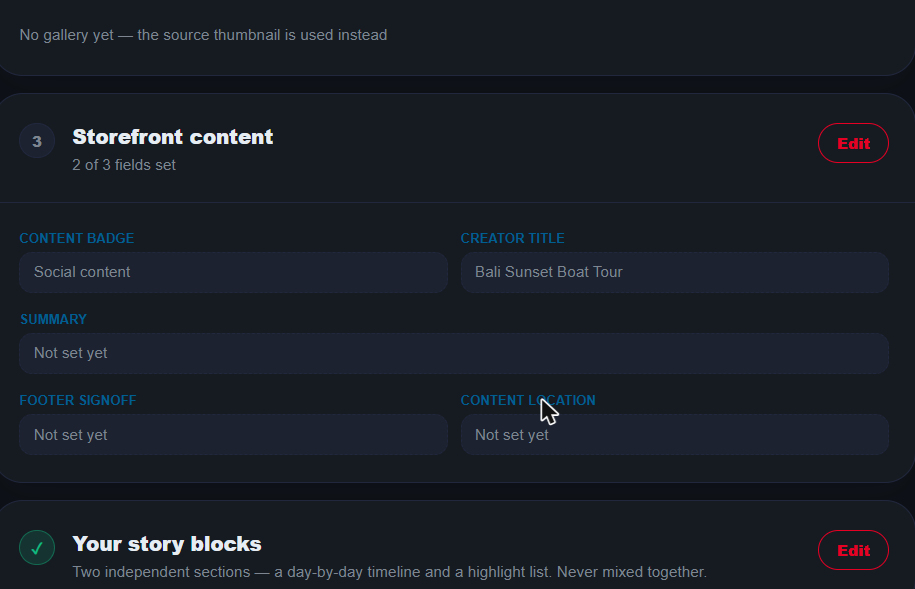
Storefront editor — story blocks, primary product, Getting Around & recommendations, collapsed
4
Add product recommendations
Pick from the product catalog — hotels, activities, accessories, itineraries — and add a short note on why you recommend each one. Group them by journey stage: Before you go, While you're there, or Take with you.
search_off
Can't find the hotel or activity you want to add?
If it's not in the catalog yet, use the "Add product" option in the picker to create it, then attach it to your page — you don't need to wait on anyone to add it for you. Full steps are in Chapter 17.
location_off
Can't find your city or town in location search?
Not every destination is loaded yet. You can still create the product and refine its location afterward — see Chapter 17 for what to do when a place doesn't show up in search.
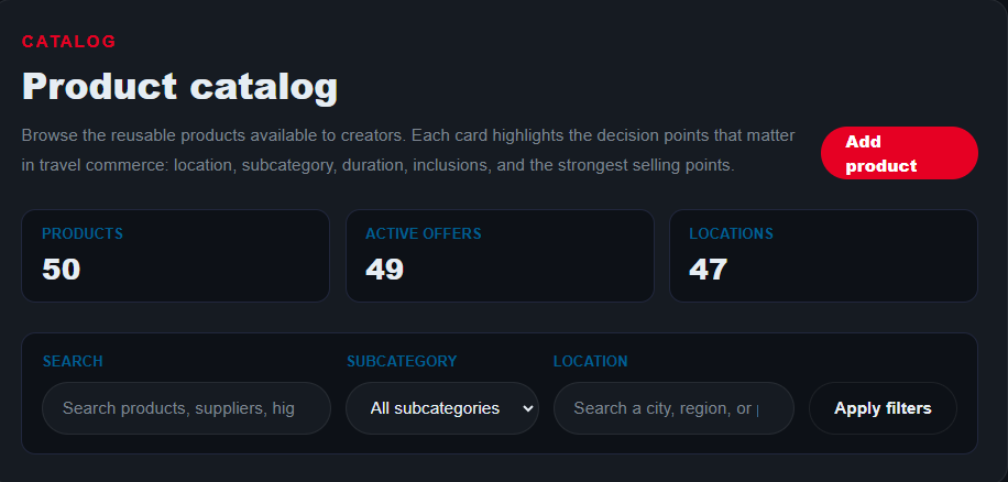
Product catalog — search, filter, and select
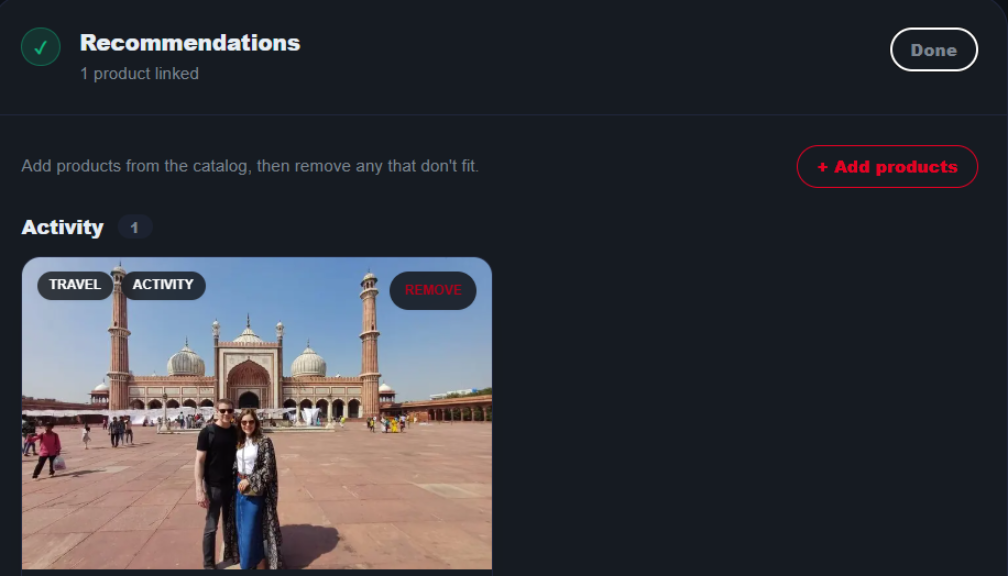
Added, tagged "While you're there"
5
Pin your primary pick
Optional
Set one product as your primary recommendation and it's featured front and center. Doing this also turns this Storefront into a dedicated Product page — the detail page for that one hotel, activity, or itinerary.
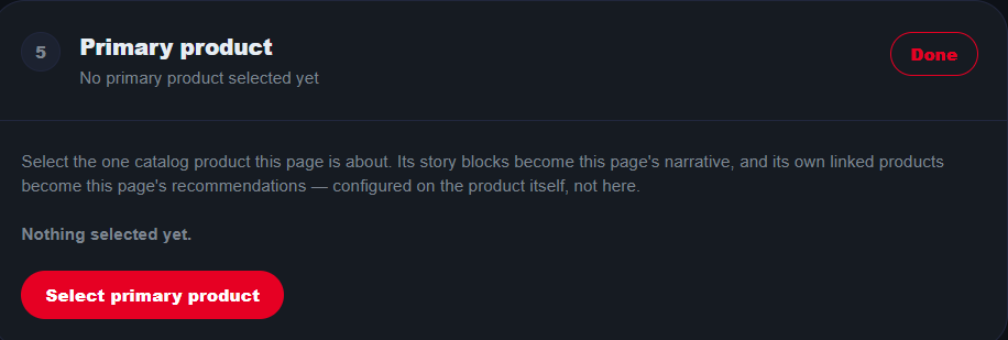
Storefront editor — Primary product
6
Preview
Check how the page looks on mobile — this is exactly what your audience will see.
smartphone
Storefront preview — mobile view
Screenshot coming soon
7
Publish
Your page goes live at pitshop.ai/@yourslug/your-page-name, and it's automatically added to your default page at pitshop.ai/@yourslug.
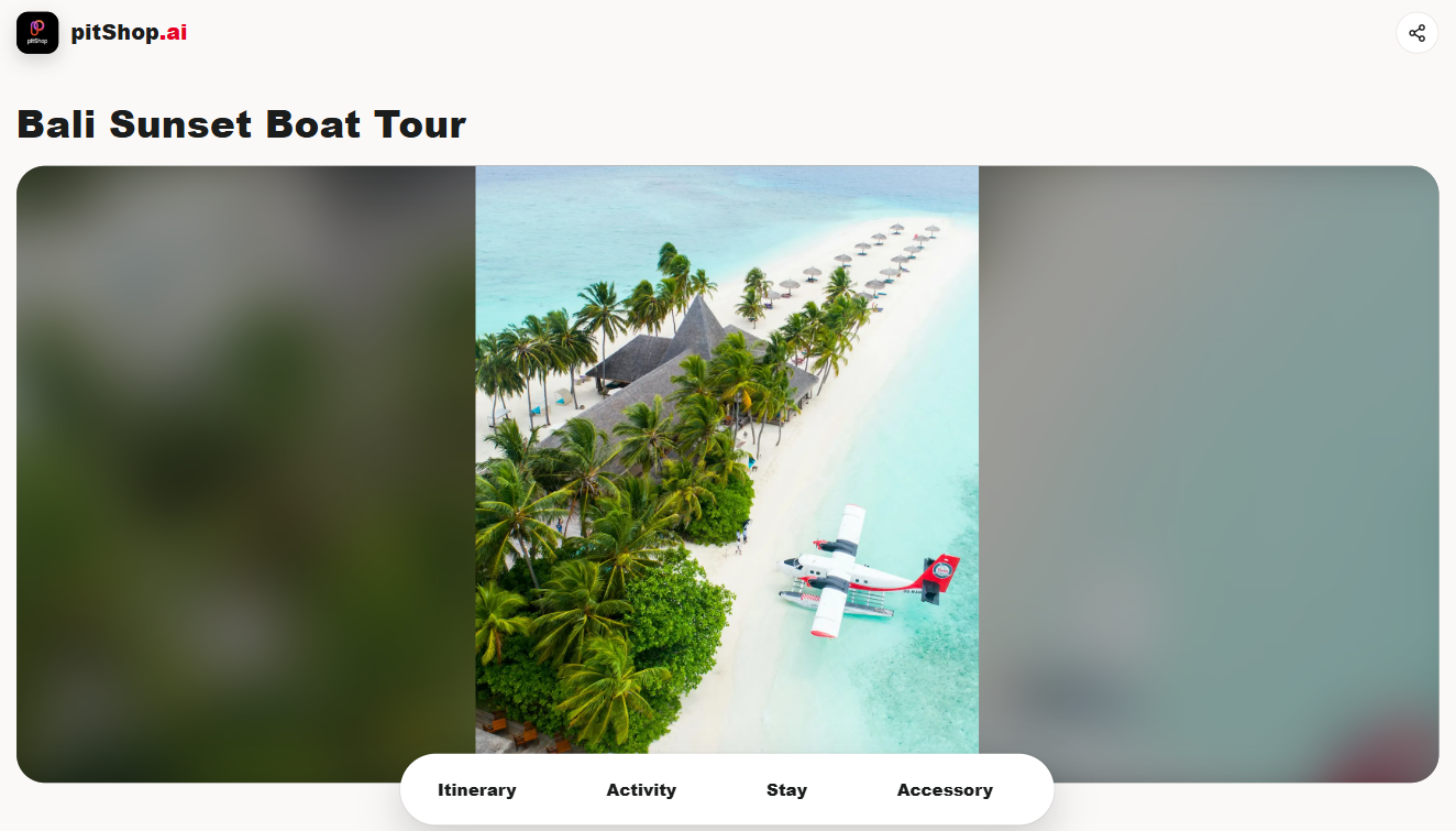
Published Storefront — live public page
6
Part I · Getting started
Sharing your Storefront link
A published Storefront only earns for you once people actually reach it. Put the link everywhere your audience already is:
- Your link-in-bio
- The video description, if this came from a YouTube video
- A pinned comment
- Your Instagram bio, story, or a comment reply
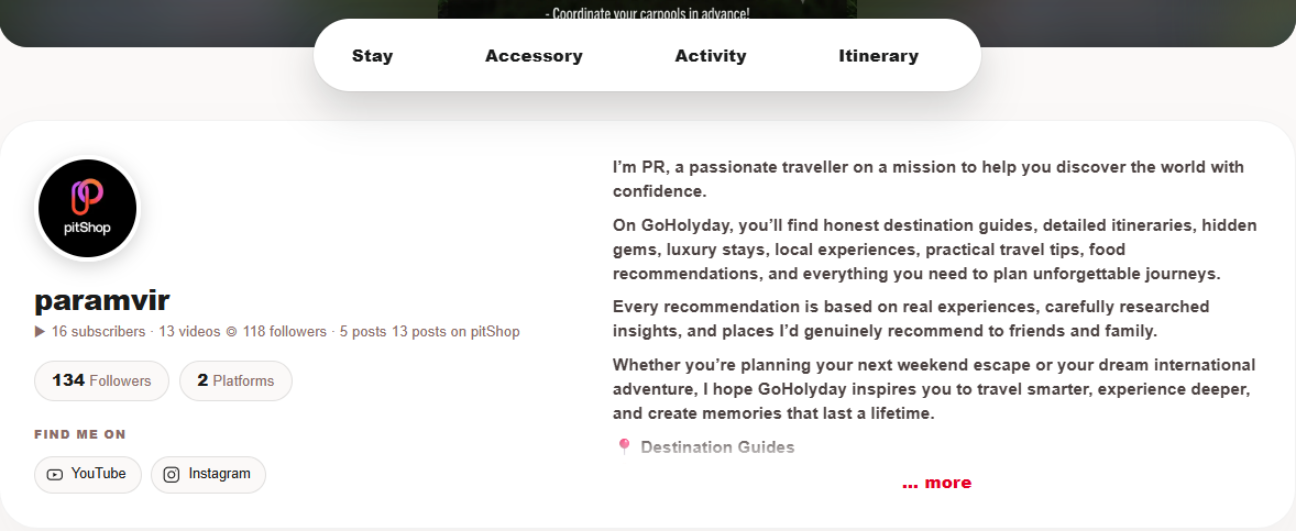
Your default page — every published Storefront collects here automatically
That's a complete first Storefront, start to finish. Part II picks up from here — managing multiple Storefronts, building out your product catalog, and customizing your public profile.
7
Part II · Building out
Managing your Storefronts
Every piece of content you've added lives under My Storefronts — one running list, whatever stage each page is at.
Each row shows the same things you set up in Chapter 5: a status badge (draft or published), the source, its title, and how many products are recommended on it. View opens the live page if it's published; Edit reopens the same editor you used to build it — nothing about editing an existing Storefront is different from creating one.
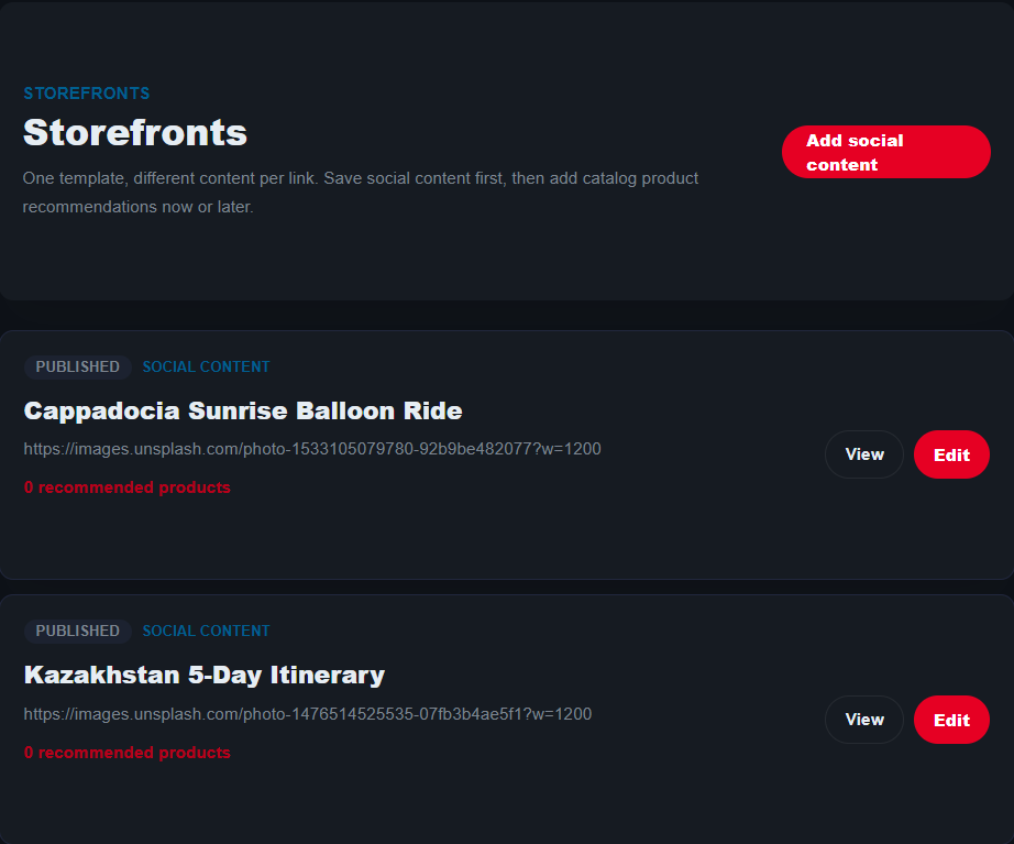
My Storefronts — a running list of every page you've built
Storefronts vs. Product pages
These aren't two separate things to manage — a Product page is just a Storefront that has a primary product pinned to it (Chapter 5, step 5). Pin one and it starts showing up under Product pages too, as the dedicated detail page for that hotel, activity, or itinerary. Unpin it and it's back to being a plain Storefront. Edit either from the same place.
info
Unpublishing
Open a Storefront's editor and remove its primary content or take it out of your recommendations to stop it counting toward your published total — there's no separate "unpublish" switch; the page reflects what's actually filled in.
8
Part II · Building out
Building your product catalog
The product catalog is shared, reusable inventory — hotels, activities, itineraries, accessories, and a growing set of lifestyle categories (fashion, beauty, wellness, everyday, gadgets, automotive). Anything in it can be recommended on any of your Storefronts.
Product catalog — search, filter, and browse
Search and filter
Narrow the catalog by keyword, subcategory, or location — the same picker you used inside a Storefront's Recommendations step in Chapter 5. Stats at the top track how many products, active offers, and distinct locations are currently in the catalog.
Add a product
Click Add product from the catalog page (or "+ Add product" from inside any picker) to create a new catalog entry. Once saved, it's immediately available to recommend — yours or any other creator's Storefronts.
search_off
Catalog search coming up empty?
See Chapter 17 for what to do when a hotel, activity, or location isn't in the system yet.
9
Part II · Building out
Customizing your public profile
Everything about how you present yourself lives in Settings — the same four cards the Setup Wizard touched on, now fully editable, plus one more.
Profile
Your display name, bio, avatar, social links, and primary platform/handle — this is what appears on your default page at pitshop.ai/@yourslug.
Gallery
The same photo gallery from Setup Wizard step 3 — add, remove, or reorder up to ten photos here. Whichever one is marked primary becomes your storefront's cover image.
Social platforms
Connect or reconnect YouTube and Instagram, or check what's currently linked.
Section order
Your default page groups recommended products by type — My Trips, Experiences I took, My stays, What's in my bag, and so on for whichever categories you've actually recommended. This editor lets you reorder those sections, so the ones that matter most to your audience show up first.
10
Part III · Growing & monetizing
Links
One place to grab any link you need to share.
Your bio link
Your default page address — pitshop.ai/@yourslug — with a one-tap copy button. This is the one link worth putting in your actual Instagram/YouTube bio, since it always reflects everything you've published.
Per-content deep links
Every published Storefront and Product page gets its own copyable link here too, for when you want to point at one specific page — a pinned comment or a video description, for instance.
upcoming
Campaign links — coming soon
A preview of tagged links for tracking a specific placement (a pinned comment vs. a story, say) is visible on this page, but it isn't wired up to real click data yet.
11
Part III · Growing & monetizing
Lead Magnets
Two upcoming product types, previewed here with sample data so you can see the shape of what's coming before it's real.
Downloads
PDFs, checklists, and guides you'll be able to give away or sell to capture leads.
Connects & Workbooks
Consults, communities, and interactive workbooks that turn followers into leads.
science
Not live yet
Both pages here are shown with sample data — this product type doesn't exist to create for real yet. Nothing to set up in the meantime.
12
Part III · Growing & monetizing
Auto DM
Turn an Instagram comment into an automatic DM carrying your storefront link — set up per Storefront, monitored from here.
Setting up a rule
Auto-reply lives inside each Storefront's own editor, as an "Auto-reply to comments" section — it's Instagram-only, and needs Instagram connected with the right permission (Chapter 17 has the fix if reconnecting is required). Turn it on, set a trigger phrase (e.g. "LINK"), and any comment containing that phrase — anywhere in it, case-insensitive — gets an automatic DM back with that page's link.
The DM message is optional to customize: leave it blank to use the default (which always discloses the message was sent automatically), or write your own using {link} where the URL should go.
This page: your control tower
Every rule you've turned on, across every Storefront, shows up here — whether it's on or off, and how it's performing. If a rule fails repeatedly, it pauses itself automatically; reconnecting Instagram is usually the fix.
13
Part III · Growing & monetizing
My Videos
The same content from My Storefronts, viewed through a video lens — every import, the page it created, and how it's published.
At a glance: which platforms you've connected content from, how many videos turned into pages this month, and the live/draft split. The list below repeats every video with its platform, page type, and status — useful when you specifically want "what have I posted lately," rather than "what needs editing."
14
Part IV · Tracking your success
Home & Dashboards
Home is your daily glance; Dashboards is where the real numbers live.
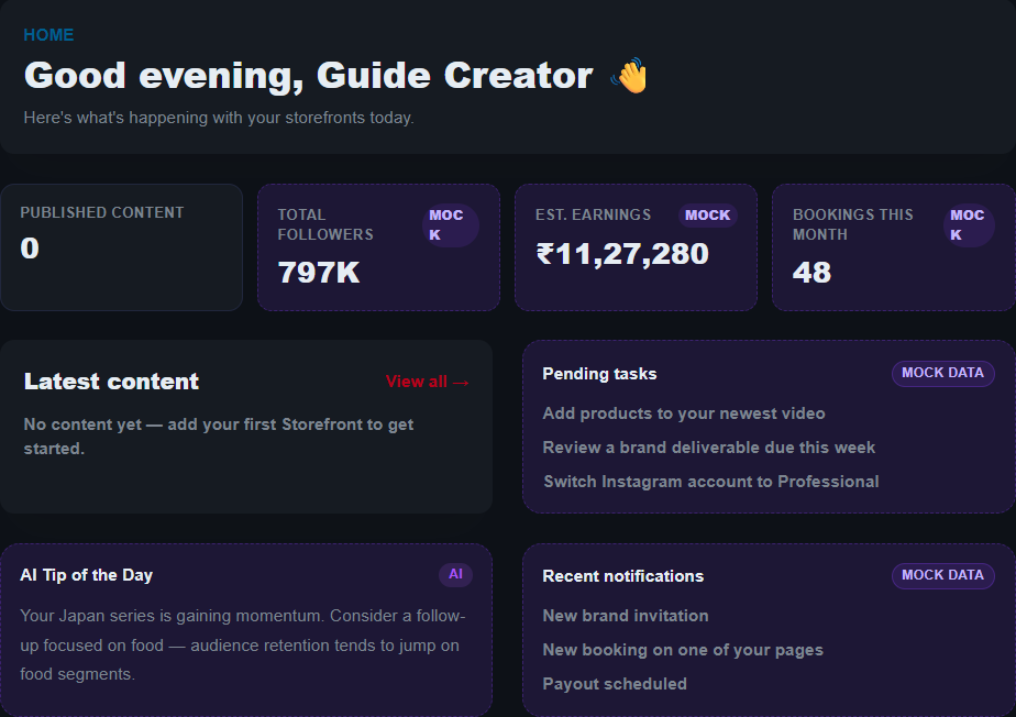
Home — published content, latest activity, an AI tip of the day
Home
Your published-content count, latest Storefronts, an AI-generated tip based on what's working, and a "Coming to pitShop" strip previewing what's next (brand deals, a UGC marketplace, an AI creator assistant). Some tiles here — followers, estimated earnings, bookings, pending tasks, notifications — are marked MOCK and show sample data until the underlying feature is live; everything else reflects your real content.
Dashboards
Real click-funnel data: page views through to product clicks, switchable Daily/Weekly/Monthly, and filterable down to one Storefront or one product. A per-product table breaks out impressions, detail opens, offer clicks, and click rate; picking a video page also surfaces its YouTube view/like/comment counts. A Social Intelligence panel sits alongside it with audience insights.
15
Part IV · Tracking your success
Earnings
Every stage from a click to money in your account — previewed here with sample data until payouts are actually wired up.
The shape of what's coming: confirmed & payable, estimated & pending, and your wallet balance as three headline numbers; a stage-by-stage breakdown below them; and a last-payout / next-payout summary. Nothing here is connected to real transactions yet.
16
Part V · Help & support
Resources
A curated set of topics under Getting started and Content ideas & strategy — this guide is exactly what the "Getting started with your storefront" one points to. The rest (earning more, best practices, content ideas, creator FAQs) are topics worth having on your radar as you grow.
17
Part V · Help & support
Common concerns & troubleshooting
Straight answers to the things creators actually ask about.
Is my password safe if I connect Instagram or Meta?
Yes. Connecting Instagram uses Meta's own sign-in and consent screen — you authorize pitShop.ai there, directly with Meta, never inside our app. We only ever receive a permission token, not your password, and you can revoke that token at any time from your Instagram/Meta account settings without contacting us.
I can't connect my Instagram account
The most common causes:
- You haven't accepted our tester invitation yet. While pitShop.ai is still pending Instagram's App Review, connecting only works for creators who've accepted a tester invitation on Instagram first. See Accepting Your Instagram Tester Invitation for the one-time steps — this is by far the most common reason the connection fails during early access.
- Personal account. Instagram requires a Business or Creator account for this kind of connection — switch over in Instagram's own settings (it's free and doesn't affect your existing followers or posts), then try again.
- A permission got declined. On Meta's consent screen, make sure every requested permission is approved — declining even one can silently break the connection.
- The session timed out. Meta's authorization screen expires after a few minutes. If it's been a while, start the connect flow again from the beginning rather than resuming an old tab.
Still stuck after trying all three? Use Contact support (Chapter 18) — include which step the error appeared on.
I can't find the hotel or activity I want to add to my storefront
The catalog is community-built, so not everything exists yet. From the product picker (or the catalog page directly), use + Add product to create it yourself — fill in what you know, attach it, and it's usable immediately, no approval wait. See Chapter 8 for the full add-product flow.
I can't find my city or town in location search
Location coverage is still being filled in and some smaller destinations aren't loaded yet. You don't need to wait on it: create the product anyway, leave the location as close as search allows (a nearby larger city, for instance), and refine it once your destination is added. If it's been missing a while, flag it to Contact support (Chapter 18) so it can get prioritized.
18
Part V · Help & support
Contact support
Three ways in, depending on what you need:
- Help Centre — browse articles, guides, and how-tos
- Raise a support ticket — report an issue or get help personalized to your account
- FAQs — quick answers to the most common creator questions
A
Appendix
Glossary of terms
A few words this guide (and the product) use more precisely than everyday usage.
- Creator — your public commerce persona on pitShop.ai, distinct from your login identity.
- Storefront — a page pairing one piece of your content with the products you recommend in it. One template, different content each time.
- Product — a catalog entry describing what's being recommended (a hotel, activity, itinerary, or item) — no destination URL or commission details live here.
- Offer — where and how a customer actually acts on a Product: the destination URL, tracking link, and affiliate details.
- Product Recommendation — your endorsement of a specific Product on a specific Storefront, including your note and its journey-stage tag.
- Product page — a Storefront with a primary product pinned to it, making it the dedicated detail page for that one hotel, activity, or itinerary.
- Journey stage — where a recommendation fits in a traveller's trip: Before you go, While you're there, or Take with you.
- Default page — your profile page at pitshop.ai/@yourslug, where every published Storefront automatically rolls up.
- Creator Inquiry — your application record from the /join form, tracked from submission through review to invite.